~$ x11vnc -display :0 -auth guess -usepw
우분투 20.04 vnc서버실행
2025. 7. 4. 14:34
gdb file 심볼로드 해라~~~!
2016. 2. 18. 20:43
gdb에서 심볼파일을 로드하는 명령은
“file”이다.

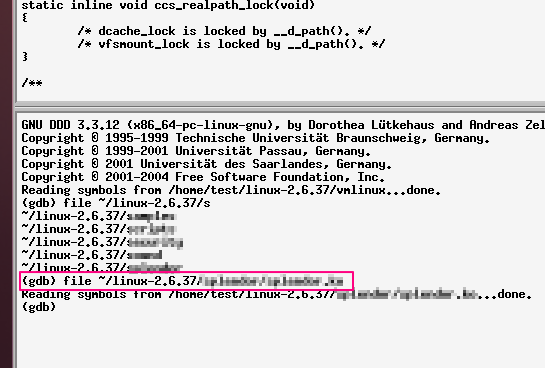
위와 같이 하면 됩니다.

이것도 몰랐나?
그래요
몰랐습니다...
이제 리눅스의 시대가 점점더
넓어질 것입니다.
리눅스 커널은 지구랑 같이 갈것 같습니다.
리눅스에서환경변수 명령 export
2016. 2. 16. 13:51
환경변수...

윈도우는
set
이라는 명령으로 확인이 가능하죵~~!
C:\Users\Jesus001>set ALLUSERSPROFILE=C:\ProgramData APPDATA=C:\Users\Jesus001\AppData\Roaming asl.log=Destination=file CLIENTNAME=LITTLEJESUS-PC CommonProgramFiles=C:\Program Files\Common Files CommonProgramFiles(x86)=C:\Program Files (x86)\Common Files CommonProgramW6432=C:\Program Files\Common Files COMPUTERNAME=JESUS001-PC ComSpec=C:\Windows\system32\cmd.exe DXSDK_DIR=C:\Program Files (x86)\Microsoft DirectX SDK (June 2010)\ FP_NO_HOST_CHECK=NO HOMEDRIVE=C: HOMEPATH=\Users\Jesus001 LOCALAPPDATA=C:\Users\Jesus001\AppData\Local LOGONSERVER=\\JESUS001-PC NUMBER_OF_PROCESSORS=8 OS=Windows_NT Path=C:\Program Files\Common Files\Microsoft Shared\Windows Live;C:\Program Files (x86 (x86)\Intel\OpenCL SDK\2.0\bin\x64;C:\Program Files (x86)\Microsoft SQL Server\90\Tool ft DNX\Dnvm\;C:\Program Files (x86)\Windows Kits\8.1\Windows Performance Toolkit\;C:\P PATHEXT=.COM;.EXE;.BAT;.CMD;.VBS;.VBE;.JS;.JSE;.WSF;.WSH;.MSC PROCESSOR_ARCHITECTURE=AMD64 PROCESSOR_IDENTIFIER=Intel64 Family 6 Model 42 Stepping 7, GenuineIntel PROCESSOR_LEVEL=6 PROCESSOR_REVISION=2a07 ProgramData=C:\ProgramData ProgramFiles=C:\Program Files ProgramFiles(x86)=C:\Program Files (x86) ProgramW6432=C:\Program Files PROMPT=$P$G PSModulePath=C:\Windows\system32\WindowsPowerShell\v1.0\Modules\ PUBLIC=C:\Users\Public SESSIONNAME=RDP-Tcp#0 SystemDrive=C: SystemRoot=C:\Windows TEMP=C:\Users\Jesus001\AppData\Local\Temp TMP=C:\Users\Jesus001\AppData\Local\Temp USERDOMAIN=Jesus001-PC USERNAME=Jesus001 USERPROFILE=C:\Users\Jesus001 VBOX_MSI_INSTALL_PATH=C:\Program Files\Oracle\VirtualBox\ VISUALKERNEL_DIR=C:\Program Files (x86)\Sysprogs\VisualKernel\ VISUALSVN_SERVER=C:\Program Files\VisualSVN Server\ VS140COMNTOOLS=C:\Program Files (x86)\Microsoft Visual Studio 14.0\Common7\Tools\ VS80COMNTOOLS=C:\Program Files (x86)\Microsoft Visual Studio 8\Common7\Tools\ windir=C:\Windows windows_tracing_flags=3 windows_tracing_logfile=C:\BVTBin\Tests\installpackage\csilogfile.log |
set
이라는 명령으로...
설정도 할 수 있고..
확인도 할 수 있습니다.
C:\Users\Jesus001>set /? cmd.exe 환경 변수를 보여주거나 설정하거나 지웁니다. SET [변수=[문자열]] 변수 환경 변수 이름을 지정합니다. 문자열 변수에 할당할 문자열을 지정합니다. 매개 변수 없이 'SET'이라고 입력하면, 현재 환경 변수를 볼 수 있습니다 명령 확장을 사용하면 SET는 아래와 같이 바뀝니다. SET 명령은 변수 이름만으로 호출되며, = 기호나 값으로 그 변수의 값을 표시하지는 않습니다. 예를 들어, SET P 는 문자 'P'로 시작되는 모든 변수를 표시합니다. SET 명령은 변수 이름을 현재 환경에서 찾을 수 없으면 ERRORLEVEL을 1로 설정합니다. SET 명령에서는 환경 변수 이름에 = 기호를 사용할 수 없습니다. SET 명령에는 아래와 같이 새로운 두 개의 스위치가 추가됩니다. SET /A 표현식 SET /P 변수=[promptString] /A 스위치는 = 기호의 오른쪽에 있는 문자열이 수식임을 지정합니다. 이는 계산되어 문자열로 변환되거나 지정한 변수의 새 값으로 만들어진 결과입니다. 표현식 평가기는 매우 간단하며 아래 연산을 지원합니다. () - 그룹 짓기 ! ~ - - 단일 연산자 * / % - 산술 연산자 + - - 산술 연산자 << >> - 논리 이동 - 비트단위 and ^ - 비트단위 상호 배제 or | - 비트단위 or = *= /= %= += -= - 할당 &= ^= |= <<= >>= , - 식 구분 기호 논리 연산자를 사용하면 표현식 문자열을 인용 부호로 묶어야 합니다. 표현식에서 숫자가 아닌 문자열은 환경 변수 문자열로 취급하며, 그 값은 사용하기 전에 숫자로 변환됩니다. 환경 변수 이름이 지정되었지만 현재 환경에서 정의되지 않았으면 0 값이 사용됩니다. 이렇게 하면 환경 변수 값을 가져오기 위해 % 기호를 모두 입력할 필요 없이 환경 변수 값으로 산술 연산을 수행할 수 있습니다. 명령 스크립트 밖의 명령줄에서 SET /A를 실행하면, 표현식의 마지막 값이 표시됩니다. 할당 연산자의 왼쪽에 환경 변수 이름이 있어야 합니다. 숫자 값은 아무 접두어가 없으면 십진수이며, 접두어 0x는 16진수, 0은 8진수를 나타냅니다. 그러므로 0x12, 18은 022와 같습니다. 8진수는 혼동될 수 있다는 것에 주의하십시오: 08과 09는 8, 9가 올바른 8진수가 아니므로 잘못된 수 입니다. /P 스위치는 변수의 값을 사용자가 입력한 입력 줄에 설정하도록 계속하려면 아무 키나 누르십시오 . . . |
set에 대한 도움말입니다.^^
자...
리눅스에서는
환경변수를 확인할 수 있는 방법이 뭘까요?
export라는 놈입니다.
test@ubuntu:~/linux-2.6/arch/arm/boot$ export declare -x HOME="/home/test" declare -x LANG="en_US.UTF-8" declare -x LESSCLOSE="/usr/bin/lesspipe %s %s" declare -x LESSOPEN="| /usr/bin/lesspipe %s" declare -x LOGNAME="test" declare -x LS_COLORS="rs=0:di=01;34:ln=01;36:mh=00:pi=40;33:so=01;35:do=01;35:bd=40;33;01:cd=40;33;01:or=40;31;01:su=37;41:sg=30;43:ca=30;41:tw=30;42:ow=34;42:st=37;44:ex=01;32:*.tar=01;31:*.tgz=01;31:*.arj=01;31:*.taz=01;31:*.lzh=01;31:*.lzma=01;31:*.tlz=01;31:*.txz=01;31:*.zip=01;31:*.z=01;31:*.Z=01;31:*.dz=01;31:*.gz=01;31:*.lz=01;31:*.xz=01;31:*.bz2=01;31:*.bz=01;31:*.tbz=01;31:*.tbz2=01;31:*.tz=01;31:*.deb=01;31:*.rpm=01;31:*.jar=01;31:*.war=01;31:*.ear=01;31:*.sar=01;31:*.rar=01;31:*.ace=01;31:*.zoo=01;31:*.cpio=01;31:*.7z=01;31:*.rz=01;31:*.jpg=01;35:*.jpeg=01;35:*.gif=01;35:*.bmp=01;35:*.pbm=01;35:*.pgm=01;35:*.ppm=01;35:*.tga=01;35:*.xbm=01;35:*.xpm=01;35:*.tif=01;35:*.tiff=01;35:*.png=01;35:*.svg=01;35:*.svgz=01;35:*.mng=01;35:*.pcx=01;35:*.mov=01;35:*.mpg=01;35:*.mpeg=01;35:*.m2v=01;35:*.mkv=01;35:*.webm=01;35:*.ogm=01;35:*.mp4=01;35:*.m4v=01;35:*.mp4v=01;35:*.vob=01;35:*.qt=01;35:*.nuv=01;35:*.wmv=01;35:*.asf=01;35:*.rm=01;35:*.rmvb=01;35:*.flc=01;35:*.avi=01;35:*.fli=01;35:*.flv=01;35:*.gl=01;35:*.dl=01;35:*.xcf=01;35:*.xwd=01;35:*.yuv=01;35:*.cgm=01;35:*.emf=01;35:*.axv=01;35:*.anx=01;35:*.ogv=01;35:*.ogx=01;35:*.aac=00;36:*.au=00;36:*.flac=00;36:*.mid=00;36:*.midi=00;36:*.mka=00;36:*.mp3=00;36:*.mpc=00;36:*.ogg=00;36:*.ra=00;36:*.wav=00;36:*.axa=00;36:*.oga=00;36:*.spx=00;36:*.xspf=00;36:" declare -x MAIL="/var/mail/test" declare -x OLDPWD="/home/test/linux-2.6/arch/arm" declare -x PATH="/home/test/CodeSourcery/Sourcery_G++_Lite/bin:/home/test/qemu_test/qemu_linux_arm_busybox:/home/test/CodeSourcery/Sourcery_G++_Lite/bin:/usr/local/sbin:/usr/local/bin:/usr/sbin:/usr/bin:/sbin:/bin:/usr/games" declare -x PWD="/home/test/linux-2.6/arch/arm/boot" declare -x SHELL="/bin/bash" declare -x SHLVL="1" declare -x SSH_CLIENT="192.168.33.1 11587 22" declare -x SSH_CONNECTION="192.168.33.1 11587 192.168.33.129 22" declare -x SSH_TTY="/dev/pts/3" declare -x TERM="xterm" declare -x USER="test" declare -x XDG_SESSION_COOKIE="047d2460b37629d8f1d4034400000004-1455504899.214975-1581490371" |
음...
음..설정은 어떻게 할까요?
$ export TEST=micingamza |
이렇게 하니까...
test@ubuntu:~/linux-2.6/arch/arm/boot$ export declare -x HOME="/home/test" declare -x LANG="en_US.UTF-8" declare -x LESSCLOSE="/usr/bin/lesspipe %s %s" declare -x LESSOPEN="| /usr/bin/lesspipe %s" declare -x LOGNAME="test" declare -x LS_COLORS="rs=0:di=01;34:ln=01;36:mh=00:pi=40;33:so=01;35:do=01;35:bd=40;33;01:cd=40;33;01:or=40;31;01:su=37;41:sg=30;43:ca=30;41:tw=30;42:ow=34;42:st=37;44:ex=01;32:*.tar=01;31:*.tgz=01;31:*.arj=01;31:*.taz=01;31:*.lzh=01;31:*.lzma=01;31:*.tlz=01;31:*.txz=01;31:*.zip=01;31:*.z=01;31:*.Z=01;31:*.dz=01;31:*.gz=01;31:*.lz=01;31:*.xz=01;31:*.bz2=01;31:*.bz=01;31:*.tbz=01;31:*.tbz2=01;31:*.tz=01;31:*.deb=01;31:*.rpm=01;31:*.jar=01;31:*.war=01;31:*.ear=01;31:*.sar=01;31:*.rar=01;31:*.ace=01;31:*.zoo=01;31:*.cpio=01;31:*.7z=01;31:*.rz=01;31:*.jpg=01;35:*.jpeg=01;35:*.gif=01;35:*.bmp=01;35:*.pbm=01;35:*.pgm=01;35:*.ppm=01;35:*.tga=01;35:*.xbm=01;35:*.xpm=01;35:*.tif=01;35:*.tiff=01;35:*.png=01;35:*.svg=01;35:*.svgz=01;35:*.mng=01;35:*.pcx=01;35:*.mov=01;35:*.mpg=01;35:*.mpeg=01;35:*.m2v=01;35:*.mkv=01;35:*.webm=01;35:*.ogm=01;35:*.mp4=01;35:*.m4v=01;35:*.mp4v=01;35:*.vob=01;35:*.qt=01;35:*.nuv=01;35:*.wmv=01;35:*.asf=01;35:*.rm=01;35:*.rmvb=01;35:*.flc=01;35:*.avi=01;35:*.fli=01;35:*.flv=01;35:*.gl=01;35:*.dl=01;35:*.xcf=01;35:*.xwd=01;35:*.yuv=01;35:*.cgm=01;35:*.emf=01;35:*.axv=01;35:*.anx=01;35:*.ogv=01;35:*.ogx=01;35:*.aac=00;36:*.au=00;36:*.flac=00;36:*.mid=00;36:*.midi=00;36:*.mka=00;36:*.mp3=00;36:*.mpc=00;36:*.ogg=00;36:*.ra=00;36:*.wav=00;36:*.axa=00;36:*.oga=00;36:*.spx=00;36:*.xspf=00;36:" declare -x MAIL="/var/mail/test" declare -x OLDPWD="/home/test/linux-2.6/arch/arm" declare -x PATH="/home/test/CodeSourcery/Sourcery_G++_Lite/bin:/home/test/qemu_test/qemu_linux_arm_busybox:/home/test/CodeSourcery/Sourcery_G++_Lite/bin:/usr/local/sbin:/usr/local/bin:/usr/sbin:/usr/bin:/sbin:/bin:/usr/games" declare -x PWD="/home/test/linux-2.6/arch/arm/boot" declare -x SHELL="/bin/bash" declare -x SHLVL="1" declare -x SSH_CLIENT="192.168.33.1 11587 22" declare -x SSH_CONNECTION="192.168.33.1 11587 192.168.33.129 22" declare -x SSH_TTY="/dev/pts/3" declare -x TERM="xterm" declare -x TEST="micingamza" declare -x USER="test" declare -x XDG_SESSION_COOKIE="047d2460b37629d8f1d4034400000004-1455504899.214975-1581490371" |
자 보세요...
declare -x TEST=”micingamza”
가 보이시죠^^???
자...
사용해볼까요^^?
test@ubuntu:~/linux-2.6/arch/arm/boot$ echo $TEST micingamza |
음..
자...
echo 라는 명령으로
확인할 수 있어요
$TEST라는 환경변수를
찍어라는 명령인거죠~~!!!
후후후
DAC Discretionary Access Control
2015. 12. 23. 22:50
DAC
Discretionary Access Control

discretionary
디스크래서내리
/dɪˈskrɛʃ əˌnɛr i/
자유재량...
dis·cre·tion·ar·y
dis·cre·tion
디스~크레~션~

1250년 정도에 사용하기 시작한 단어이군요..
Late Latin 후기 라틴?
Middle English 중세 영어?
Anglo-Frech 안글로 프랑스?
라틴, 영국, 프랑스 동시에 사용했던 언어라... (아니~~~~~이럴 수가~~~)
라틴어 영어 프랑스에서 동시에 사용할 수 있는 단어가 있단 말인가?
noun 1. the power or right to decide or act according to one's own judgment; freedom of judgment or choice: It is entirely within my discretion whether I will go or stay. 2. the quality of being discreet, especially with reference to one's own actions or speech;prudence or decorum: Throwing all discretion to the winds, he blurted out the truth. |
자유로운 결정인데..
점잔하고 신중하게..
재량이란 한자가 가장 잘 어울리는 단어인것 같다.
재량2 (裁量) [재량] [명사] 1. 자기의 생각과 판단에 따라 일을 처리함. 2. <법률> [같은 말] 자유재량(2. 행정청이 공익이나 행정의 목적에 보다 적합한 것이 무엇인지를 판단하는 행위). |
디스크레셔네리~~
인터넷에서 뒤져서 나온 그림
discretionary 관련 그림;;;
Link : https://c1.staticflickr.com/1/569/22196166203_dd812d92b2_b.jpg

음...
리눅스에서는 파일에 권한을 설정할 수 있어요^^
[root@localhost ~]# ls -la total 127648 dr-xr-x---. 27 root root 4096 Dec 18 11:01 . dr-xr-xr-x. 20 root root 4096 Dec 7 20:40 .. -rw-------. 1 root root 1351 Dec 4 14:35 anaconda-ks.cfg -rw-------. 1 root root 18599 Dec 23 15:18 .bash_history -rw-r--r--. 1 root root 18 Jun 19 2015 .bash_logout -rw-r--r--. 1 root root 176 Jun 19 2015 .bash_profile -rw-r--r--. 1 root root 176 Jun 19 2015 .bashrc drwxr-xr-x. 16 root root 4096 Dec 4 19:21 buildroot drwx------. 13 root root 4096 Dec 11 16:42 .cache drwxr-xr-x. 8 root root 4096 Nov 11 09:00 ccs-tools drwx------. 15 root root 4096 Dec 11 16:41 .config -rw-r--r--. 1 root root 100 Jun 19 2015 .cshrc drwx------. 4 root root 4096 Dec 18 20:07 .ddd |
ls -la
라는 명령을 내리면
리눅스는
현재 디렉토리의 모든 파일의 권한을 표시해주죠~~
[root@localhost ~]# ls -la total 127648 dr-xr-x---. 27 root root 4096 Dec 18 11:01 . |
dr-xr-x---
이게 파일이 속성과 권한을 나타내는 거죠~~
[속성]
d : 디렉토리 속성
[권한]
r : 읽기권한 가지고 있음(read)
x : 실행권한 가지고 있음(execution)
w : 쓰기권한 가지고 있음(write)
이렇게 파일에 대해서만.......위 3가지권한을 지정하는 것을
DAC라고 말해요
D
D
D
Discretionary
디스크래션래리...재량..
접근제어(Access Control)
이라고 하죠~!
파일 소유자권한/그룹권한/다른사용자 권한
을 지정 하는 것입니다.
이런데 이것만 가지고는 헛점이 생기는게 문제이니다.
예를 들면,
root 이면...
모든 것을 다할 수 있는데
DAC로는 root의 권한을
제어할 수 없는게 문제죠~~!
그래서, 이 파일에 대해서만 접근제어를 하는 것 보다
더 엄격한 접근제어를 할 수 있는 기능인
MAC(Mandatory Access Control)이
나오게 된 것입니다.
MAC는 보통 Kernel Object에 대한 접근 제어를 할 수 있어요
그래서 Kernel Object가 생성되는
시점에..
제어를 할 수 있는 기회를 준답니다.
SELinux
TOMOYO
AppAmor
등...
다양한
MAC방법이 있습니다.
하지만
복잡합니다.
;;;;
[참고]
https://en.wikipedia.org/wiki/Discretionary_access_control
http://dictionary.reference.com/browse/prudence
터밍메카드~리눅스 계정 추가해봐~~!
2015. 12. 22. 23:03

터닝메카드...
리눅스에
계정을 추가해~~
계정~~
계정을 말이다~~!!

흐흐흐
웃기는 꼬마구나....
그게 그렇게 쉬운줄 아냐?~~~
쉽지...
어디서 어렵다고
구라냐~~
자..
내가 보여주겠다...
리눅스에 계정을 추가하는 모습을~~~!!!
자 그냥
useradd
를 치면된다고~~!!
유저에드 |
[root@localhost ~]# useradd test2 [root@localhost ~]# cat /etc/passwd | grep test2 test2:x:1002:1002::/home/test2:/bin/bash |
test2 라는 계정을 추가했습니다.
그랬더니
/etc/passwd라는 파일에
test2라고 하는 항목이 추가되었어요~~!!
이렇게요~~!!
test2:x:1002:1002::/home/test2:/bin/bash 아~ 봐도 모르겠다~~!! 1002는 또 뭐야? /home/test2는 사용자 홈 디렉토리 같군~~!! /bin/bash 는 또 뭐야? 아..머리 아파.. 오늘은 여기까지~~!! |
busybox너는 누구니?
2015. 12. 15. 14:54
너는 뭐냐?
busybox~~
~~
비즈박스는 뭐죠?
대대체...비즈박스만 나와요..
심지어 init도..
exe의 경로는
/bin/busybox
로만 나옵니다..
왜그러는거죠?
# pwd /proc/1 # ls -la exe lrwxrwxrwx 1 root root 0 Dec 15 05:39 exe -> /bin/busybox |
음...
그래서 /sbin/init의
실체를 확인해보았습니다.
# ls -la /sbin/init lrwxrwxrwx 1 root root 14 Dec 4 08:44 /sbin/init -> ../bin/busybox |
아니 이런;;;

/sbin/init은~~
‘../bin/busybox’
의 링크였군요~~!!
이런 이런
심지어
모든 파일이 다...
busybox에 링크되어 있었습니다.
;;;;
# cd /bin
# ls -la
total 550
drwxr-xr-x 2 root root 2048 Dec 4 10:22 .
drwxr-xr-x 18 root root 1024 Dec 4 10:22 ..
lrwxrwxrwx 1 root root 7 Dec 4 08:44 ash -> busybox
-rwsr-xr-x 1 root root 555868 Dec 4 10:22 busybox
lrwxrwxrwx 1 root root 7 Dec 4 08:44 cat -> busybox
lrwxrwxrwx 1 root root 7 Dec 4 08:44 catv -> busybox
lrwxrwxrwx 1 root root 7 Dec 4 08:44 chattr -> busybox
lrwxrwxrwx 1 root root 7 Dec 4 08:44 chgrp -> busybox
lrwxrwxrwx 1 root root 7 Dec 4 08:44 chmod -> busybox
lrwxrwxrwx 1 root root 7 Dec 4 08:44 chown -> busybox
lrwxrwxrwx 1 root root 7 Dec 4 08:44 cp -> busybox
lrwxrwxrwx 1 root root 7 Dec 4 08:44 cpio -> busybox
lrwxrwxrwx 1 root root 7 Dec 4 08:44 date -> busybox
lrwxrwxrwx 1 root root 7 Dec 4 08:44 dd -> busybox
lrwxrwxrwx 1 root root 7 Dec 4 08:44 df -> busybox
lrwxrwxrwx 1 root root 7 Dec 4 08:44 dmesg -> busybox
lrwxrwxrwx 1 root root 7 Dec 4 08:44 dnsdomainname -> busybox
lrwxrwxrwx 1 root root 7 Dec 4 08:44 dumpkmap -> busybox
lrwxrwxrwx 1 root root 7 Dec 4 08:44 echo -> busybox
lrwxrwxrwx 1 root root 7 Dec 4 08:44 egrep -> busybox
lrwxrwxrwx 1 root root 7 Dec 4 08:44 false -> busybox
lrwxrwxrwx 1 root root 7 Dec 4 08:44 fdflush -> busybox
lrwxrwxrwx 1 root root 7 Dec 4 08:44 fgrep -> busybox
lrwxrwxrwx 1 root root 7 Dec 4 08:44 getopt -> busybox
lrwxrwxrwx 1 root root 7 Dec 4 08:44 grep -> busybox
lrwxrwxrwx 1 root root 7 Dec 4 08:44 gunzip -> busybox
lrwxrwxrwx 1 root root 7 Dec 4 08:44 gzip -> busybox
lrwxrwxrwx 1 root root 7 Dec 4 08:44 hostname -> busybox
lrwxrwxrwx 1 root root 7 Dec 4 08:44 kill -> busybox
lrwxrwxrwx 1 root root 7 Dec 4 08:44 linux32 -> busybox
lrwxrwxrwx 1 root root 7 Dec 4 08:44 linux64 -> busybox
lrwxrwxrwx 1 root root 7 Dec 4 08:44 ln -> busybox
lrwxrwxrwx 1 root root 7 Dec 4 08:44 login -> busybox
lrwxrwxrwx 1 root root 7 Dec 4 08:44 ls -> busybox
lrwxrwxrwx 1 root root 7 Dec 4 08:44 lsattr -> busybox
lrwxrwxrwx 1 root root 7 Dec 4 08:44 mkdir -> busybox
lrwxrwxrwx 1 root root 7 Dec 4 08:44 mknod -> busybox
lrwxrwxrwx 1 root root 7 Dec 4 08:44 mktemp -> busybox
lrwxrwxrwx 1 root root 7 Dec 4 08:44 more -> busybox
lrwxrwxrwx 1 root root 7 Dec 4 08:44 mount -> busybox
lrwxrwxrwx 1 root root 7 Dec 4 08:44 mountpoint -> busybox
lrwxrwxrwx 1 root root 7 Dec 4 08:44 mt -> busybox
lrwxrwxrwx 1 root root 7 Dec 4 08:44 mv -> busybox
lrwxrwxrwx 1 root root 7 Dec 4 08:44 netstat -> busybox
lrwxrwxrwx 1 root root 7 Dec 4 08:44 nice -> busybox
lrwxrwxrwx 1 root root 7 Dec 4 08:44 pidof -> busybox
lrwxrwxrwx 1 root root 7 Dec 4 08:44 ping -> busybox
lrwxrwxrwx 1 root root 7 Dec 4 08:44 pipe_progress -> busybox
lrwxrwxrwx 1 root root 7 Dec 4 08:44 printenv -> busybox
lrwxrwxrwx 1 root root 7 Dec 4 08:44 ps -> busybox
lrwxrwxrwx 1 root root 7 Dec 4 08:44 pwd -> busybox
lrwxrwxrwx 1 root root 7 Dec 4 08:44 rm -> busybox
lrwxrwxrwx 1 root root 7 Dec 4 08:44 rmdir -> busybox
lrwxrwxrwx 1 root root 7 Dec 4 08:44 run-parts -> busybox
lrwxrwxrwx 1 root root 7 Dec 4 08:44 sed -> busybox
lrwxrwxrwx 1 root root 7 Dec 4 08:44 setarch -> busybox
lrwxrwxrwx 1 root root 7 Dec 4 08:44 setserial -> busybox
lrwxrwxrwx 1 root root 7 Dec 4 10:22 sh -> busybox
lrwxrwxrwx 1 root root 7 Dec 4 08:44 sleep -> busybox
lrwxrwxrwx 1 root root 7 Dec 4 08:44 stty -> busybox
lrwxrwxrwx 1 root root 7 Dec 4 08:44 su -> busybox
lrwxrwxrwx 1 root root 7 Dec 4 08:44 sync -> busybox
lrwxrwxrwx 1 root root 7 Dec 4 08:44 tar -> busybox
lrwxrwxrwx 1 root root 7 Dec 4 08:44 touch -> busybox
lrwxrwxrwx 1 root root 7 Dec 4 08:44 true -> busybox
lrwxrwxrwx 1 root root 7 Dec 4 08:44 umount -> busybox
lrwxrwxrwx 1 root root 7 Dec 4 08:44 uname -> busybox
lrwxrwxrwx 1 root root 7 Dec 4 08:44 usleep -> busybox
lrwxrwxrwx 1 root root 7 Dec 4 08:44 vi -> busybox
lrwxrwxrwx 1 root root 7 Dec 4 08:44 watch -> busybox
lrwxrwxrwx 1 root root 7 Dec 4 08:44 zcat -> busybox
[참고]
http://manpages.ubuntu.com/manpages/precise/man1/busybox.1.html
vi에게 명령하기- 'J' 아래행 합치기~~!
2015. 12. 8. 13:48

명령한다...
사진출처는 : http://cs.kumoh.ac.kr/fb/61776
이곳이라고 합니다.
이 사진을 보고
Vi를 공부합니다.
저자권 주장하시면 바로 내리겠습니다.^^

명령모드로 바꿔...

ESC를 누르면..명령모드로 변경...

오늘 익힐 Vi 명령은
대문자 ‘J’
J
를 누르면..
밑에 있는 행과 한줄이 됩니다..
--------

genext2fs 빌드하기....
2015. 12. 7. 20:33
리눅스에서
qemu를 실행시킬려면..
root file system 이미지를 어떻게든 만들어줘야 합니다.
그런데
root file system을 만드는 방법은
이세상에 아주 많을 것입니다.
그 중 현재까지 제가 알아낸 방법중...
genext2fs 라는 녀석을 이용하는 방법에 대해서
설명해 볼까 해요~~
일단.
소스를 받아 옵니다.
어디에서?
여기에서요^^
http://sourceforge.net/projects/genext2fs/files/latest/download?source=typ_redirect

자. 리눅스에서는
wget명령어로
다음과 같이 받아와 버렸습니다.^^
그리고
성공하면..다음과 같이 파일이 생기고요~~
[root@localhost tmp]# ls -la total 116 drwxr-xr-x. 3 root root 4096 Dec 7 17:04 . dr-xr-x---. 12 root root 4096 Dec 7 17:04 .. drwxrwsrwx. 3 test test 4096 Apr 20 2007 genext2fs-1.4.1 |
[root@localhost tmp]# tar xvzf genext2fs-1.4.1.tar.gz |
압축을 풀어주고요~~~
이제 컴파일을 하면 됩니다.~~~!!!
[root@localhost genext2fs-1.4.1]# ls -la total 464 drwxrwsrwx. 3 test test 4096 Apr 20 2007 . drwxr-xr-x. 3 root root 4096 Dec 7 17:04 .. -rw-rw-r--. 1 test test 31120 Apr 20 2007 aclocal.m4 -rw-r--r--. 1 test test 38 May 3 2001 AUTHORS -rw-r--r--. 1 test test 82 Nov 22 2004 ChangeLog -rw-rw-r--. 1 test test 3782 Apr 20 2007 config.h.in -rwxrwxr-x. 1 test test 206164 Apr 20 2007 configure -rw-r--r--. 1 test test 1040 Apr 20 2007 configure.in -rw-r--r--. 1 test test 17992 May 3 2001 COPYING -rwxr-xr-x. 1 test test 15936 Jan 7 2007 depcomp -rw-r--r--. 1 test test 2979 May 13 2005 device_table.txt -rw-r--r--. 1 test test 5179 Dec 1 2006 genext2fs.8 -rw-r--r--. 1 test test 72491 Mar 26 2007 genext2fs.c -rw-r--r--. 1 test test 180 Jan 2 2007 INSTALL -rwxr-xr-x. 1 test test 9233 Jan 7 2007 install-sh drwxrwsrwx. 2 test test 4096 Apr 20 2007 m4 -rw-r--r--. 1 test test 227 Feb 1 2007 Makefile.am -rw-rw-r--. 1 test test 21436 Apr 20 2007 Makefile.in -rwxr-xr-x. 1 test test 11014 Jan 7 2007 missing -rw-r--r--. 1 test test 182 Apr 20 2007 NEWS -rw-r--r--. 1 test test 430 May 18 2005 README -rw-r--r--. 1 test test 1377 Jan 2 2007 test-gen.lib -rwxr-xr-x. 1 test test 2175 Jan 2 2007 test-mount.sh -rwxr-xr-x. 1 test test 1939 Dec 1 2006 test.sh -rw-r--r--. 1 test test 183 Dec 1 2006 TODO |
소스의 압축을 풀면 ...
저런 것들(^^)이 보일 것입니다.^^
이중에
./configure
를 실행시켜줘야 합니당~~!
[root@localhost genext2fs-1.4.1]# ./configure checking for a BSD-compatible install... /usr/bin/install -c checking whether build environment is sane... yes checking for gawk... gawk checking whether make sets $(MAKE)... yes checking for gcc... gcc checking for C compiler default output file name... a.out checking whether the C compiler works... yes checking whether we are cross compiling... no checking for suffix of executables... checking for suffix of object files... o checking whether we are using the GNU C compiler... yes checking whether gcc accepts -g... yes checking for gcc option to accept ISO C89... none needed checking for style of include used by make... GNU checking dependency style of gcc... gcc3 checking for a BSD-compatible install... /usr/bin/install -c checking for dirent.h that defines DIR... yes checking for library containing opendir... none required checking how to run the C preprocessor... gcc -E checking for grep that handles long lines and -e... /usr/bin/grep checking for egrep... /usr/bin/grep -E checking for ANSI C header files... yes checking for sys/types.h... yes checking for sys/stat.h... yes checking for stdlib.h... yes checking for string.h... yes checking for memory.h... yes checking for strings.h... yes checking for inttypes.h... yes checking for stdint.h... yes checking for unistd.h... yes checking whether sys/types.h defines makedev... yes checking fcntl.h usability... yes checking fcntl.h presence... yes checking for fcntl.h... yes checking for inttypes.h... (cached) yes checking limits.h usability... yes checking limits.h presence... yes checking for limits.h... yes checking for memory.h... (cached) yes checking stddef.h usability... yes checking stddef.h presence... yes checking for stddef.h... yes checking for stdint.h... (cached) yes checking for stdlib.h... (cached) yes checking for string.h... (cached) yes checking for strings.h... (cached) yes checking for unistd.h... (cached) yes checking libgen.h usability... yes checking libgen.h presence... yes checking for libgen.h... yes checking getopt.h usability... yes checking getopt.h presence... yes checking for getopt.h... yes checking for an ANSI C-conforming const... yes checking for uid_t in sys/types.h... yes checking for inline... inline checking for size_t... yes checking for ssize_t... yes checking for struct stat.st_rdev... yes checking for getopt_long... yes checking for getline... yes checking for strtof... yes checking for snprintf... yes checking for vsnprintf... yes checking for working snprintf... yes checking for working vsnprintf... yes checking for stdlib.h... (cached) yes checking whether scanf can malloc... yes configure: creating ./config.status config.status: creating Makefile config.status: creating config.h config.status: executing depfiles commands config.status: executing default commands |
이렇게 하면...
./config.status
라는 녀석(파일)이 생깁니다.
이것을 다시 실행해면 ~~~
[root@localhost genext2fs-1.4.1]# ./config.status config.status: creating Makefile config.status: creating config.h config.status: config.h is unchanged config.status: executing depfiles commands config.status: executing default commands |
Makefile을
만듭니다...
그러면 이제 make를 하면 되겠죠^^!!!
이걸 몰랐네요...
ㅋㅋㅋㅋㅋ
리눅스 무식자여~~~;;;흐흐흐
[root@localhost genext2fs-1.4.1]# make make all-am make[1]: Entering directory '/root/tmp/genext2fs-1.4.1' if gcc -DHAVE_CONFIG_H -I. -I. -I. -g -O2 -MT genext2fs.o -MD -MP -MF ".deps/genext2fs.Tpo" -c -o genext2fs.o genext2fs.c; \ then mv -f ".deps/genext2fs.Tpo" ".deps/genext2fs.Po"; else rm -f ".deps/genext2fs.Tpo"; exit 1; fi gcc -g -O2 -o genext2fs genext2fs.o make[1]: Leaving directory '/root/tmp/genext2fs-1.4.1' |
자 make까지 성공!!!
이제 genext2fs 라는 파일이 생겼겠죠^^?
[root@localhost genext2fs-1.4.1]# ls -la total 844 drwxrwsrwx. 4 test test 4096 Dec 7 17:10 . drwxr-xr-x. 3 root root 4096 Dec 7 17:04 .. -rw-rw-r--. 1 test test 31120 Apr 20 2007 aclocal.m4 -rw-r--r--. 1 test test 38 May 3 2001 AUTHORS -rw-r--r--. 1 test test 82 Nov 22 2004 ChangeLog -rw-r--r--. 1 root test 4027 Dec 7 17:06 config.h -rw-rw-r--. 1 test test 3782 Apr 20 2007 config.h.in -rw-r--r--. 1 root test 20670 Dec 7 17:08 config.log -rwxr-xr-x. 1 root test 30687 Dec 7 17:06 config.status -rwxrwxr-x. 1 test test 206164 Apr 20 2007 configure -rw-r--r--. 1 test test 1040 Apr 20 2007 configure.in -rw-r--r--. 1 test test 17992 May 3 2001 COPYING -rwxr-xr-x. 1 test test 15936 Jan 7 2007 depcomp drwxr-sr-x. 2 root test 4096 Dec 7 17:10 .deps -rw-r--r--. 1 test test 2979 May 13 2005 device_table.txt -rwxr-xr-x. 1 root test 114860 Dec 7 17:10 genext2fs -rw-r--r--. 1 test test 5179 Dec 1 2006 genext2fs.8 -rw-r--r--. 1 test test 72491 Mar 26 2007 genext2fs.c -rw-r--r--. 1 root test 174080 Dec 7 17:10 genext2fs.o -rw-r--r--. 1 test test 180 Jan 2 2007 INSTALL -rwxr-xr-x. 1 test test 9233 Jan 7 2007 install-sh drwxrwsrwx. 2 test test 4096 Apr 20 2007 m4 -rw-r--r--. 1 root test 21165 Dec 7 17:08 Makefile -rw-r--r--. 1 test test 227 Feb 1 2007 Makefile.am -rw-rw-r--. 1 test test 21436 Apr 20 2007 Makefile.in -rwxr-xr-x. 1 test test 11014 Jan 7 2007 missing -rw-r--r--. 1 test test 182 Apr 20 2007 NEWS -rw-r--r--. 1 test test 430 May 18 2005 README -rw-r--r--. 1 root test 23 Dec 7 17:08 stamp-h1 -rw-r--r--. 1 test test 1377 Jan 2 2007 test-gen.lib -rwxr-xr-x. 1 test test 2175 Jan 2 2007 test-mount.sh -rwxr-xr-x. 1 test test 1939 Dec 1 2006 test.sh -rw-r--r--. 1 test test 183 Dec 1 2006 TODO |
흐...생겼네요~~~
genext2fs!!!!
이런 이런...
왜 난 몰랐을까?
./configure -->./config.status --> make
를 하면 된다는 것을~~~
흐흐흐
리눅스 초보 미친감자여~~
화이팅
